What Is A Biopsy?
A biopsy is a piece of tissue which is removed from the body during a surgical procedure. This could be a minimally invasive procedure for removing superficial tissue like skin or it can be part of a more invasive surgery like the removal of a uterus or gallbladder. There are many reasonswhy tissue may need to be removed during a biopsy, but the most common reason is due to suspicion of cancer. Biopsies are processed in a section of the lab called “Histology”. It is here that pathologists and histology technicians process the tissue in order to prepare it for placement on a slide for examination by a pathologist.
Grossing of Biopsy Tissue
The first stop for any biopsy is the grossing area of the Anatomic Pathology section. The tissue will arrive in a jar which is filled with formalin in order to preserve the specimen.
The pathologist will then cut the biopsy into several smaller pieces while annotating various descriptions like size dimensions, color, necrosis and other notable characteristics. The voice dictation is typically done with the assistance of a recording device which is controlled by a foot pedal while speaking. Although the task of grossing is primarily done by pathologists, it may also be performed by pathology assistants if they are available in that facility.
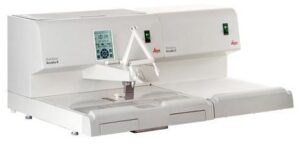
Tissue Processor

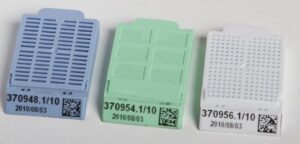
Once the tissue is grossed into smaller pieces, they are placed into tiny cassettes which snap closed to help remain secure. They are also labeled with some sort of accession number in order to properly identify the specimen and link it to a patient. They are then loaded into an automated processor which dehydrates the tissue and prepares it to be infiltrated with paraffin, making it easier when its time to cut with the “microtome”. The processor will cycle through various concentrations of ethanol ranging from 70% to 100%, as well as xylene and paraffin. Processing takes several hours and is typically performed overnight.
Embedding
Once the tissue has been run through the processor, it is now ready for embedding. This is where the tissue is strategically “embedded” into a block of paraffin wax, giving it the structure needed to fit in the microtome block holder.
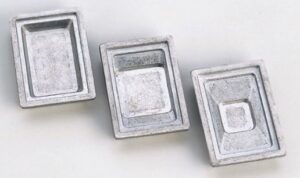
Once you open up the cassette from the processor, you can visualize the size of tissue and choose a mold which is proportionate to its size. These molds range in various sizes and are usually made of stainless steel.
The next step is to inject a small amount of molten paraffin into the mold and place the tissue into the center. This can be tedious particularly with certain specimens. For example, when embedding skins, they should be stood up “on edge” instead of just laid flat.
Now, move the mold to a cold plate which rapidly cools the paraffin, turning it solid and keeping the tissue in place. Only keep on the cold plate long enough to anchor the tissue. If minor adjustments to the tissue placement needs to be made, it can be done up to a certain point with some forceps. But, if too much time has passed and the paraffin has hardened too much, it must be melted and restarted over.
Now, grab the bottom of the specimen’s cassette and place it on top of the mold, then completely fill with paraffin.
Move the cassette and mold over to the cold plate and let it sit until it has cooled all the way. Once it has solidified, remove the steel mold and you will be left with the embedded specimen block. If there is any excess paraffin that hardened on the outer edges of the cassette, it will need to be scraped off or else it will be too big to fit in the microtome block holder.
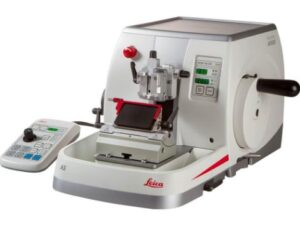
Trimming “Facing”
The next phase of the process is trimming or “facing”. This is done by making larger diameter cuts into the block in order to expose as much of the tissue cross section as possible. These are 3 dimensional pieces of tissue which don’t all lay perfectly flat, so some will require deeper trimming than others.
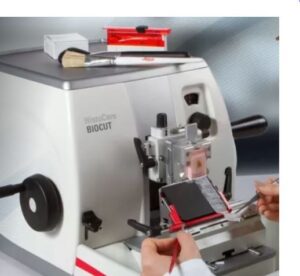
Trimming involves placing the cassette into the block holder of the microtome with the paraffin side facing out towards the tech. Next, it is carefully aligned so that it is almost touching the blade. This may take several passes and is done by manually moving the rotary arm back and forth.
Once the block is properly aligned, the trimming may begin. Instead of manually moving the rotary arm, the electronic method is now used where the chuck will move up and down automatically by use of a foot pedal. Each movement up and down will bring the block closer and closer to the blade in order to maintain contact. The speed can be adjusted depending on how fast you want the trimming to go. Larger cuts of around 20 um are made until the proper depth has been achieved, but will depend on the preferences of each individual tech. Long ribbons of paraffin and tissue will begin to accumulate below the blade and can be discarded. These ribbons are of no use for making slides because they are cut far too thick for examination purposes.
Care must be taken to keep fingers clear of the blade area since they can easily get cut off. Also, you must pay close attention in order to avoid cutting too deep and losing the specimen. In some cases, the entire paraffin portion of the block can get inadvertently cut off in the first pass if it wasn’t aligned improperly. In this instance, you can potentially remelt the block and start over, but sometimes, it may leave irreparable damage to the biopsy tissue.
Once the tissue has been trimmed to the proper depth, it is then placed onto a block of melting ice to keep it cool while waiting to be cut. Keeping the tissue on a cold and wet surface will help the ribbons to not be compressed and will aid in minimizing wrinkles.
Cutting
Once blocks have been trimmed to their proper depths, they are now ready for cutting. These are the cuts which will actually be examined by the pathologist and will be cut at a much thinner diameter of 5 um.
Take a cassette from the ice block and secure into the block holder of the microtome. Carefully, align the blade to the block using the manual rotary lever. Once aligned, push the foot pedal to begin automatic cutting and watch as the ribbons begin to fall.
If the ribbons have lines in them, it may be due to a dull blade. Change blades often in order to avoid this.
Also, discard a few transition ribbons in between the trimming phase and the cutting phase in order to polish the face of the block before pulling the final cuts. This will help reduce tiny holes from forming in the ribbon.
Transfer these ribbons to a warm water bath of around 40° C where they will float until ready to transfer to a slide. The water bath technique is extremely helpful in keeping wrinkles out of the ribbon, which is a strict no-go when accounting for slide quality. Skimming of the water bath between each block is important in order to prevent carryover of tissue fragments between specimens.
Depending on what size of mold was used in the embedding phase, will determine how many ribbon portions can be added to each slide. This may range from 1 to 2 for larger tissues like uterus, whereas you may be able to fit 4 or 5 sections on a slide for smaller things like skins. Additionally, the number of slides made from each block will vary. Some specimens will require only 1 slide, whereas others will require up to 5 slides per block.
Once the ribbon in the water bath has had all of its wrinkles removed (which sometimes takes manual manipulation), you will grab a slide and while coming from underneath, gently scoop the sections onto the slide and set aside to air dry. Don’t let ribbons sit in the water bath for too long, or it can cause cracking and overexpansion of the tissue.
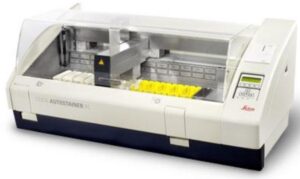
Staining of Biopsy Tissue
Slides are now ready for staining. This can be done manually, although most labs have automated staining setups. After slides have been heated in an oven which is usually integrated with the stainer, the slides will be dipped into various staining solutions.
The most commonly used stain in histology is the Hematoxylin & Eosin (H&E) stain. There are also a few special stains like Acid Fast Bacilli (AFB) and Periodic Acid Schiff (PAS) which are used on occasion.
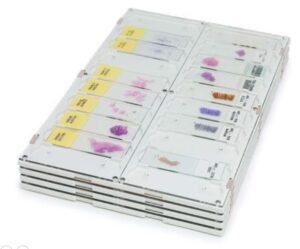
Coverslipping
Once the slides are finished staining, they need to be coverslipped once they’ve dried. By using a couple of wooden applicator sticks, transfer a few drops of a mounting fluid like Permount onto the slide and carefully place a coverslip over the top, ensuring to squeeze out any air bubbles. The amount of fluid applied is crucial because if too little is used then this could cause air bubbles, whereas if too much is used then it can leak out from under the coverslip and get messy.
Coverslipping should always be performed under a fume hood due to the harmful vapors involved with the process. As slides are completed, they are placed in a slide holder. A standard slide holder holds 20 slides total (2 rows of 10). They should be placed in sequence and properly labeled. Labels can be printed with various Laboratory Information Systems. The one that I have experience with is Cerner CoPath, but there are others available. Once the slides are labeled, they can be delivered to the pathologist for examination and diagnosis.
Conclusion
A lot of work goes into transforming a large piece of biopsy tissue into a high quality and readable slide, with each step in the process having a crucial role. Attention to detail is paramount for the histology technician.